Introduction
For over a year, I have been wanting to experiment with a wall-mounted tablet for viewing and controlling my home automation.
This week, I caught Amazon’s Fire HD10 tablets on sale for 60$ a piece, and decided to pick up a couple.
Parts / Subscriptions Required
A Tablet

For this article, I will be using a Fire HD 10 Tablet. You can pick them up as low as 50/60$ (for a refurbished one)
I will note, I have previously tried to get everything up and running on older tablets, but, I had pretty bad luck due to their web browsers being pretty far out of date…. and thus, not working too well with home assistant.
Why a fire tablet? Simple. You can pick them up quite cheap.
(Optional) A Wall Mount
This item is optional. However, I wanted a nice looking wall mount to hold the tablet. I personally went with THIS OPTION for ~ 50$ If you have a 3d printer, you can print your own case from THINGVERSE.

I will note, while I did order this mount… as of the time of writing this article, I leveraged a piece of 3m double sided tape to do the job…. since this mount is a week or two out in the mail.
(Optional) A Smart Plug
Completely optional. however, if you want to automate charging the battery, you will need a smart plug.
For this…. you can use anything that integrates with home assistant.
KASA Plugs – These are still local control as far as I know. I still have 5 or 10 of them around my house.

There are also plugs using z-wave, zigbee, etc. Up to your personal preference if you choose to do this, and what plug you choose to do it with.
Fully Kiosk
While you don’t HAVE to buy this subscription- It costs a one-time payment of around 7$ USD per device to unlock all of the features. Trust me- some of the additional features are worth having.
To note, you can fully try everything without having this license. Please feel free to experiment before buying this software. The only limitation without an active license, will be a large watermark across the screen reminding you to acquire a license.
To also note, this post is not affiliated or sponsored by Fully Kiosk in any way whatsoever.
HACs Integrations/Front End Modules Used
Fully Kiosk
This integration handles getting fully kiosk fully integrated with home assistant.
Mushroom Cards / lovelace-mushroom
These cards are pretty to look at, and are extremely suitable for a touchscreen interface, such as this tablet.
Kiosk-Mode
This card can hide side bars, menu bars, and more allowing you to more easily build suitable dashboards for mobile devices.
Slider Button Card
Thanks for the tip by r/filtertuple.
This card makes for a great sliding control for my HVAC.
Getting Started
Step 1. Acquire a tablet.
Acquire the tablet. Charge the tablet.
Configure the tablet.
UPDATE the tablet.
Once the tablet is charged, up to date, and configured, move onto the next step.
Step 2. Enable Development Mode on the Tablet
We will need to enable development mode in order to install unsigned apks (fully-kiosk).
Go to Settings, Device Options, About Fire Tablet.
Once you are here, click on the serial number field about 5 or 10 times. You will see a prompt appear at the bottom of the screen.
Go back one menu, back to device options. You should now see Developer Options.
Go into developer options.
Turn it off (at the top).
Scroll down slightly to the debugging section. Enable USB Debugging.
Installation & Configuration of Fully Kiosk
Install Fully Kiosk Browser
On the tablet, visit this page: https://www.fully-kiosk.com/en/#download-box
You can also google, “Fully Kiosk Browser” to get to this location.
You want to download, “Fully Kiosk Browser”. Click on GET APK File.
After you download this, you will receive a prompt regarding unsigned device. You will need to grant the silk browser the ability to install unknown apps. Afterwards, the app should install. Open it.
Network Configuration (Optional)
I personally want to leverage this tablet on a dedicated IOT network, where it will have no network access.
For my home network, I have a dedicated SSID for this network. I configured the device to connect to this new SSID, and gave it a static IP. The static IP is a bit important, as it ensures your device retains the same IP when home assistant tries to talk to it.
Blocking… the device from the internet, also keeps amazon from sneaking in unwanted updates… or advertisements.
Note, if you purchase a license, the device will need internet access initially to fetch the license. You can disable internet access once it is activated.
Configure Fully Kiosk Browser
The first step, was to set the default URL. I set this to https://hass.mydomain.com/
Next, I created a new non-administrative user account within home assistant, with local sign-in only, and used this new account to sign in on the tablet, remember to click the button, “Keep me signed in”
At this point, you should be able to see your home assistant dashboards on the fire tablet without issues.
BUT, we are not done yet…
Enable Fully Kiosk Remote Access (PLUS Only)
Note, Plus only, means you need to have a paid license for these features.
Swipe your screen from the left, which should reveal the fully kiosk menu.
Click Settings.
Go to Remote Administration (PLUS)
Enable Remote Administration. Set a password. Note the remote administration URL.
After which, back out of the settings screen, and you will be presented with a bunch of permissions prompts. Accept all of the permissions, and grant fully kiosk all of the other special required permissions.
From a computer on your network, browse the the remote administration URL from earlier.
From here, we can continue the process of configuring the app, without needing to interact directly with the tablet.
Enable Start on boot (PLUS Only)
Under Device Management, there is a checkbox for Launch on boot. You will want to select this.
Set Power Settings
Under Settings -> Power Settings
Note- You will want to initially set the wakeup/sleep schedules via the app instead of the remote UI.
I scheduled the device to wake up at 7:30am every day, and go to sleep at 10:30pm every night. This should correspond with times I will actually be awake.
Next, I enabled the battery warning. I set this value to 20%.
Kiosk Settings (PLUS Only)
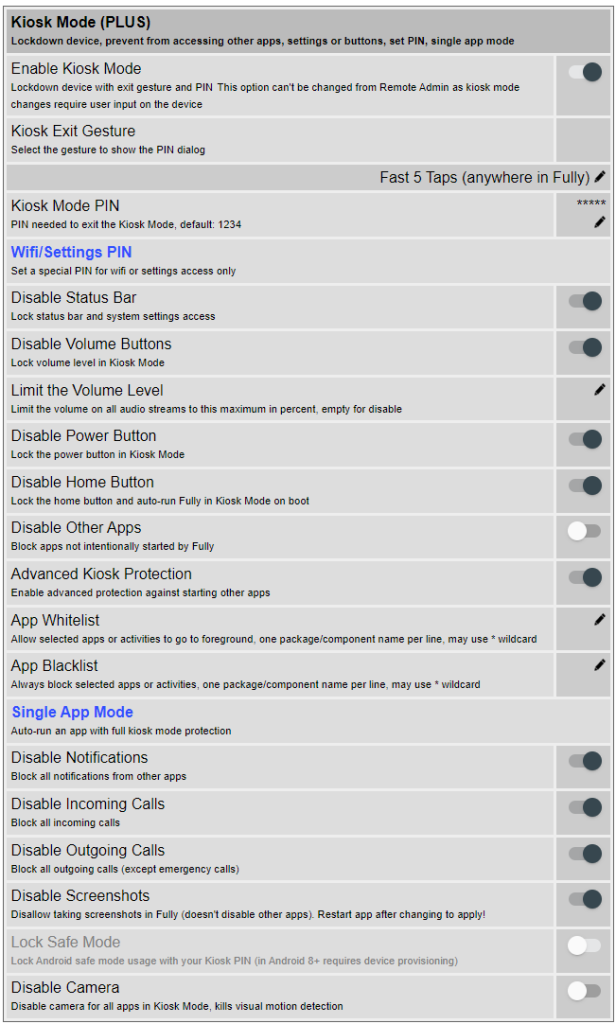
Under Settings -> Kiosk Mode
I enabled Kiosk mode. This will force a pin to exist kiosk mode. Note, I had to configure this via the app itself. I setup the exit gesture to require 5 taps on the screen.
After saving this, I needed to grant additional notifications permissions to fully Kiosk.
I also disabled all of the buttons, notifications, calls. I left the camera active for the motion detection feature.
Configure Motion Detection (PLUS Only)
Under Settings -> Motion Detection
I enabled motion detection, and enabled turning on the screen when motion is detected.
I also enabled, “Turn screen off in darkness”. If the lights are out, there is no need for this tablet to be active.

Configure “Other Settings”
Under Settings -> Other Settings.
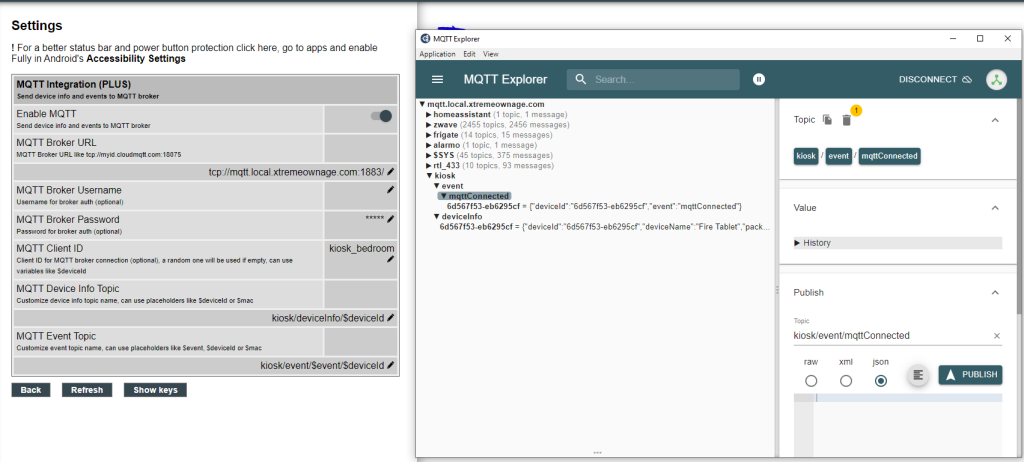
I enabled Daily Usage Stats, Environmental Sensors, and MQTT.
For MQTT, I slightly modified the topics to include the prefix of kiosk.
After saving the settings, the device instantly appeared in my broker. The devie does send motion events via MQTT as well.

Add Fully Kiosk To Home Assistant
Install Fully Kiosk Browser Integration via HACs

Self explanatory- But, install the Fully Kiosk Browser Integration via HACs. Restart home assistant afterwards.
Add The Integration
After home assistant has been added, Navigate to Settings -> Devices & Services -> Integrations.
Click Add Integration


After adding in the static IP you were told to add earlier, and your remote administration password, the integration will be added.
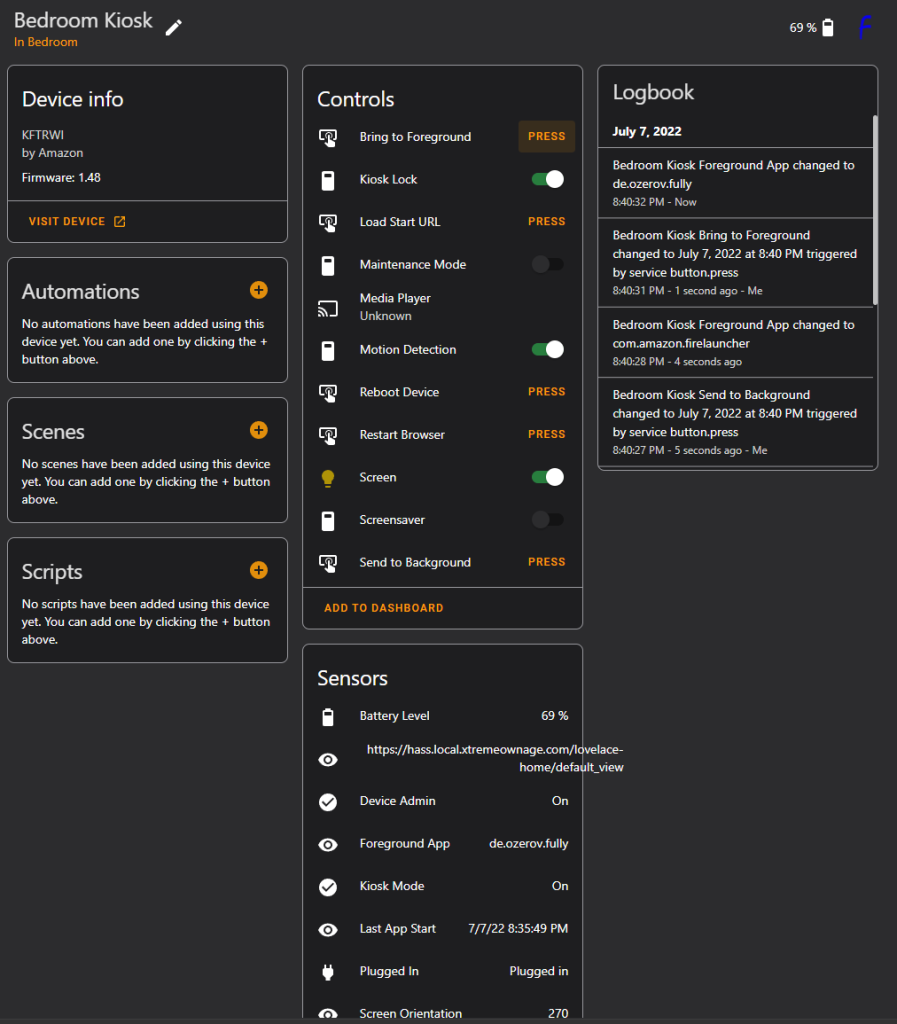
With the integration, you have the ability to manage the tablet from home assistant. You can start apps change the browser… turn it on/off, reboot it… whatever you wish!
As a bonus, you can also transmit text to speech through the tablet.
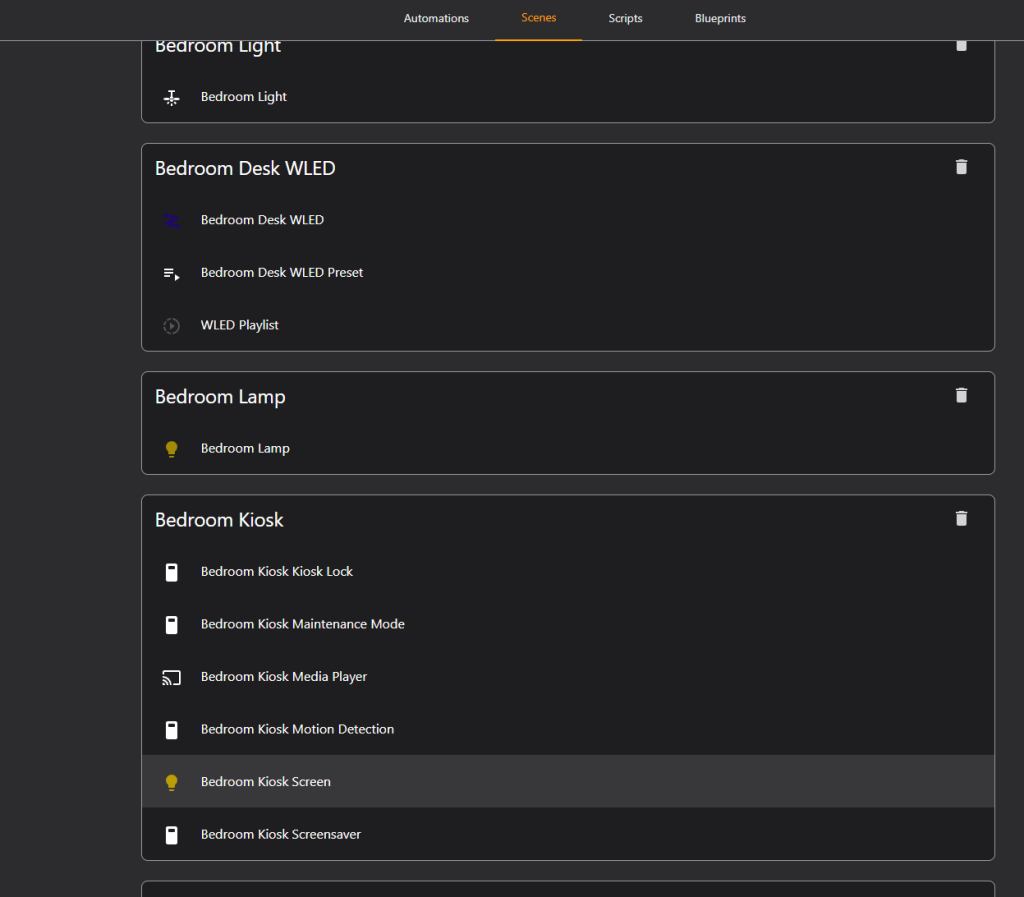
At this point, I modified a few of the scenes for my office, to turn the tablet on while my “Working” scene was active, and turn it off when my “Away” scene is active.
You can adjust the screen brightness for each scene.
Charging Automation
Some people will tell you to add a smart plug, to maintain the battery level between 20 -> 80% or so.
If, you so choose to do this, Fully Kiosk does expose the battery percentage via the integration. You can easily toggle a smart plug to control the charging this way.
If you choose to do this, I would set an automation to turn on the smart plug when it is below 20-40%, and leave it on until the device is > 80%, at which point I would disconnect the charger.
I personally, will not be doing this at this time. This device will remain plugged in forever, while sitting on my wall. While this can potentially cause battery degradation, to re-clarify, it will always be plugged in.
Create Tablet-Specific Dashboards
So, my primary dashboard isn’t exactly suited for the lower resolution of this tablet.. It was developed with a 4k screen in mind. As well, I want this tablet tailed more specifically for my office.
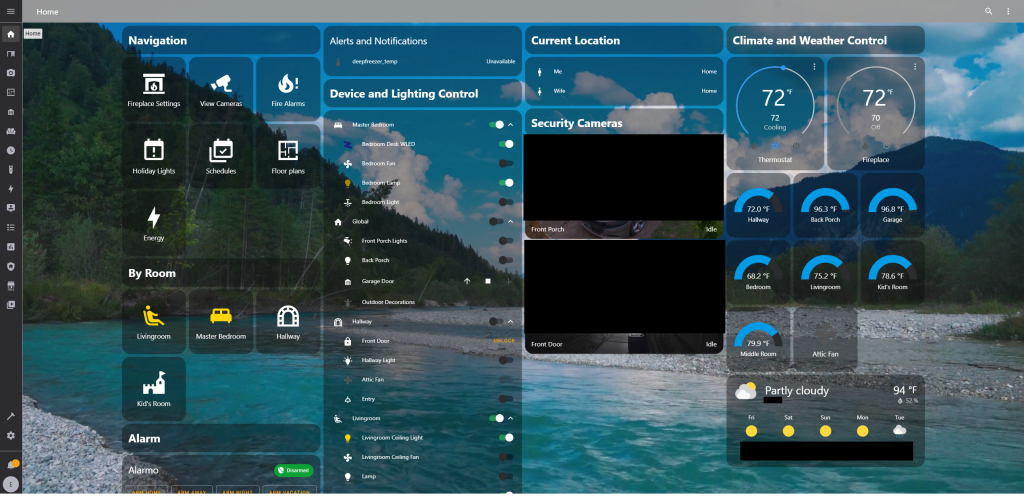
So, I will be taking the relevant elements from various dashboards to create a panel tailored specifically to the area where this tablet will be located.
I will bring attention to the kiosk-mode addon which is available via HACs. It can hide headers, sidebars, and more for your tablet user.
For my mostly-finished product-
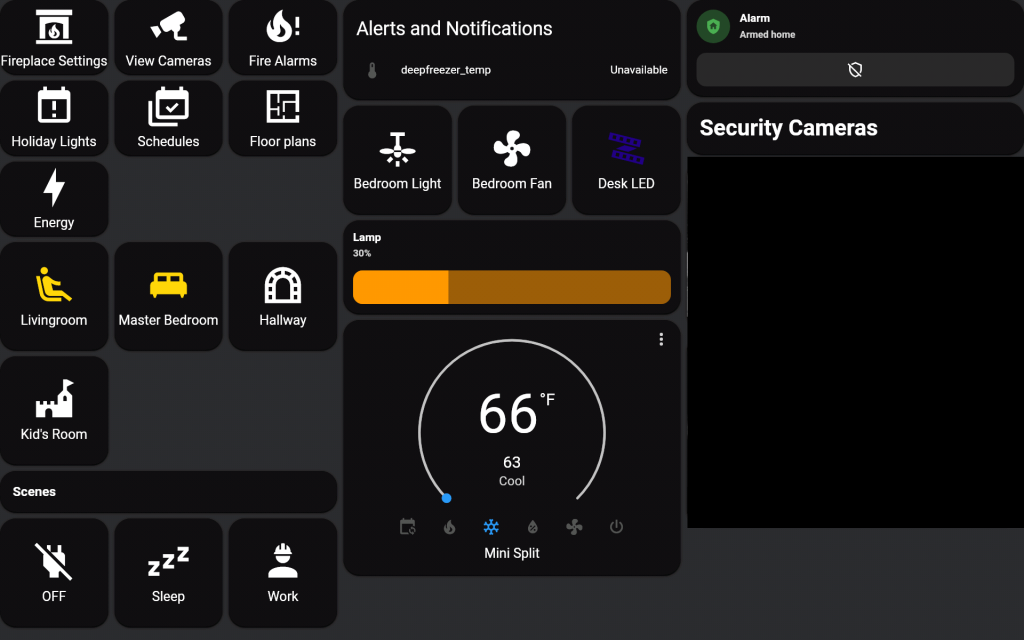
While, this, doesn’t look very… appealing on the web, Capturing a screenshot from a fire tablet is a bit more challenging than expected… especially, with a background video playing.
For an actual picture-
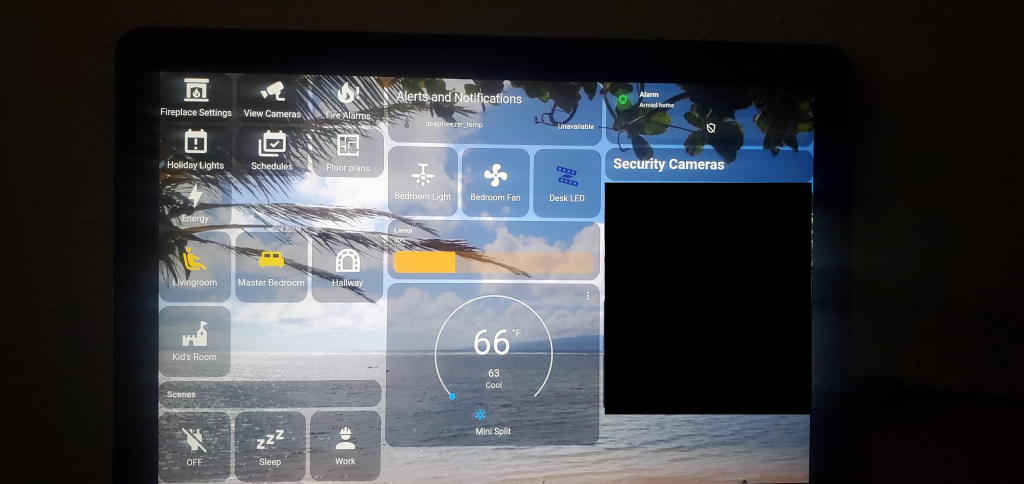
I will note, the space is almost perfectly filled up. I have instant navigation to sections of home assistant where I may need to go via the buttons on the left. I have access to all of the relevant scenes for this room on the bottom left.
The top-center panel will display any alerts I may need to be aware of. Batteries running low, devices not working. Fridge/Freezer getting too hot. Home battery running low.. Fire alarms going off… etc.
Under that, I have controls for this room’s lighting and HVAC systems. To the right, I have my home security. I have alarm control, as well as instant access to the primary security cameras on the exterior of the house.
Overall, this dashboard will likely grow and be expanded in the future. However, for now, it has all of the basic needs I would leverage while I am in the office.
For layout, the above dashboard uses…
- Single panel dashboard view, with a horizontal card with 3 columns being the only panel.
- Each column, contains a verticle stack.
- The buttons on the left, leverages the grid card.
- The lamp and alarm control leverages lovelace-mushroom.
My only big complaint right now- the thermostat card takes up a lot of screen real-estate for its given function.
7/13/22 – This issue was resolved by the slider button card, which gives a nice slider for setting the temp.

Kiosk-specific automations
Restart when “waking”
I noticed occasionally when I got up in the morning, the tablet would be displaying a white screen. After some investigation, refreshing the page would not resolve the issue. However, restarting the browser would. So…. I made an automation to do this.
Quite simply, when the screen turns on, it restarts the browser.
alias: Kiosk - Restart Browser On Wakeup
description: Kiosk likes to wake up with a blank/white screen.
trigger:
  - platform: device
    type: turned_on
    device_id: 8c55dffb0aedf92bcc0c63f9cbc6f9df
    entity_id: light.bedroom_kiosk_screen
    domain: light
condition: []
action:
  - device_id: 8c55dffb0aedf92bcc0c63f9cbc6f9df
    domain: button
    entity_id: button.bedroom_kiosk_restart_browser
    type: press
mode: single
This turned out to be a simple, yet stupid solution for fixing the issue…. and it does work.
Announce Alarmo State
A simple idea, but, I wanted the kiosk to announce the state of my alarm when it changes.
IE, when you set the alarm to “Armed Home”, the kiosk will say, “Alarm Armed Home.”
Very simple automation, but, was very effective for the task at hand.
alias: Kiosk - Announce Alarm State
description: ''
trigger:
  - platform: state
    entity_id:
      - alarm_control_panel.alarmo
condition: []
action:
  - service: tts.cloud_say
    data:
      entity_id: media_player.bedroom_kiosk_media_player
      message: >-
        Alarm {{ states('alarm_control_panel.alarmo') | regex_replace(find='_',
        replace=' ', ignorecase=False) }}
mode: single
Display NVR Popup when motion is detected
When people are detected outside of my house, I wanted to automatically announce via the kiosk, and display a live video feed of the cameras.
For this, I used the binary_sensors provided by the frigate integration for when a person is detected. When detected, I leverage the TTS service to announce motion, and then tell fully kiosk to show the blue iris footage.
After 30 seconds, it reverts back to the primary dashboard.
alias: Kiosk - NVR Popup
description: ''
trigger:
  - type: motion
    platform: device
    device_id: 3b6e1cf99252fc44fbd4ca2159ca609d
    entity_id: binary_sensor.front_door_person_motion
    domain: binary_sensor
  - type: motion
    platform: device
    device_id: ef15f114880855207dfefc401dfda68c
    entity_id: binary_sensor.front_driveway_person_motion
    domain: binary_sensor
  - type: motion
    platform: device
    device_id: ec6af8f8edaa09c3c46d4d9dec430ee1
    entity_id: binary_sensor.mailbox_person_motion
    domain: binary_sensor
condition: []
action:
  - service: tts.cloud_say
    data:
      entity_id: media_player.bedroom_kiosk_media_player
      message: Front Motion Detected
  - service: fullykiosk.load_url
    data:
      entity_id: media_player.bedroom_kiosk_media_player
      url: https://nvr.xtremeownage.com/ui3.htm?group=Front
  - delay:
      hours: 0
      minutes: 0
      seconds: 30
      milliseconds: 0
  - device_id: 8c55dffb0aedf92bcc0c63f9cbc6f9df
    domain: button
    entity_id: button.bedroom_kiosk_load_start_url
    type: press
mode: single
Hello… I have questions about this. When you say install things like Full Kiosk Browser where am I installing it? Am I on Home Assistant on the tablet or should I be signed in to a browser directly on the Home Assistant server? All this confuses me because I’m a total newbie with HA. It’s unclear to me where I need to be or if it even matters at all. Thanks in advance!
Which- part are you stuck on?
For the part of installing fully kiosk- scroll up and read over it again.
Install Fully Kiosk Browser
On the tablet, visit this page: https://www.fully-kiosk.com/en/#download-box
There is the app, which gets installed on the Tablet. From home assistant, there is an integration which will connect to it. To note- the integration is now built into home assistant and no longer requires HACs.